Every summer, Nova Scotia families load up the car, point it toward the Cabot Trail, and discover somewhere around Baddeck that a tire they should have dealt with before leaving Halifax is now their entire afternoon. A flat on the highlands, a slow leak at the top of a switchback, a spare that hasn’t been checked since 2021 — we hear these stories every September when people come back in.
A proper road trip tire checklist takes about 15 minutes in your driveway and catches virtually every problem before it becomes a roadside emergency. The Cabot Trail is one of the finest drives on the continent, but it also has remote stretches where cell service is spotty and the nearest service station is a long walk. Below is the six-point check we’d run on any car before a summer trip across Atlantic Canada.
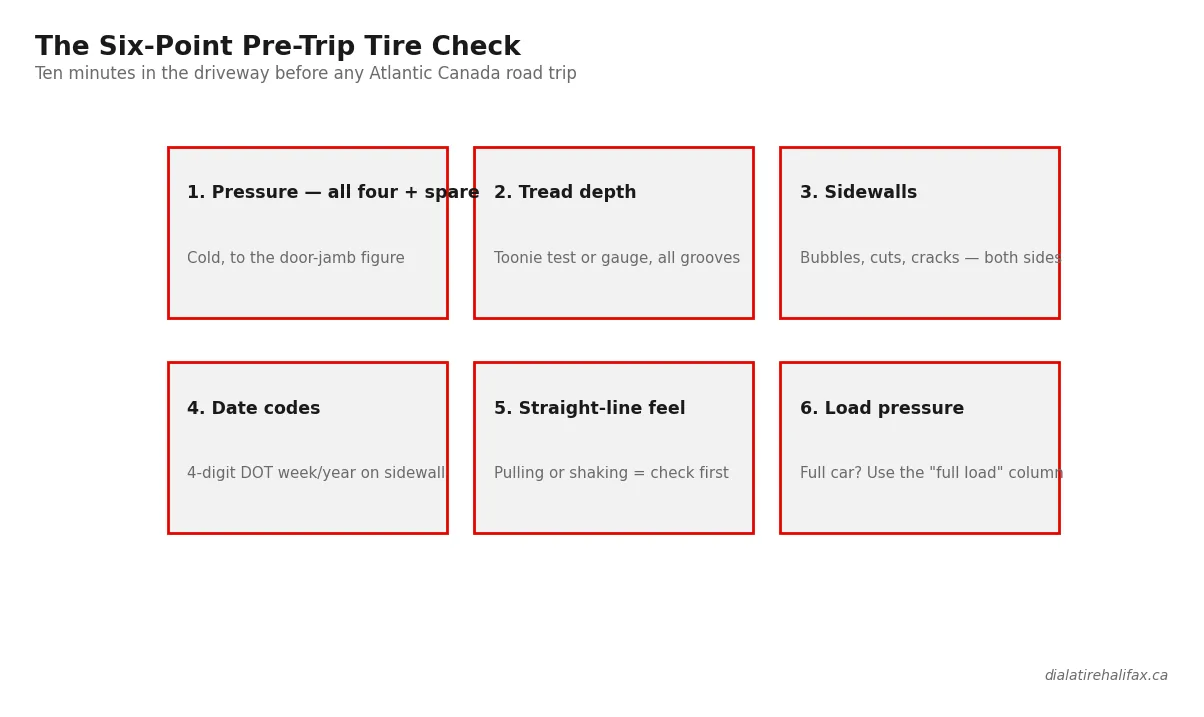
Check 1 — Tire Pressure (All Four + the Spare)
Check pressures cold — meaning the car has been sitting at least three hours and driven fewer than 2 km. Heat from driving temporarily inflates readings by 4–6 pounds per square inch (psi), making an underinflated tire look acceptable. Check first thing in the morning.
The correct pressure is on the white or yellow sticker inside the driver’s door jamb — not on the tire sidewall (that’s the maximum, not the target). The sticker shows two columns: standard pressure for everyday driving and a “full load” pressure for a packed vehicle. With four adults, a roof box, and a full boot, use the full-load column. On most sedans and crossovers, full-load rear pressure runs 3–6 psi higher than standard.
Don’t forget the spare. Full-size spares should match the drive tire pressure. Compact “donut” spares typically specify 60 psi — check your owner’s manual. A flat or cracked spare should be replaced before you leave. For more on why pressure matters, our post on the Tire Pressure Monitoring System (TPMS) warning light covers what those sensors measure and why they sometimes lag.
Check 2 — Tread Depth
Legal minimum tread depth in Nova Scotia is 1.6 mm, but anything below 4 mm in wet conditions is where stopping distances begin to climb meaningfully. On a road trip that may include the notoriously foggy Cape Breton highlands or the coastal showers that roll in off the Northumberland Strait, 4 mm is a better personal floor than the legal minimum.
The simplest field test is a Canadian quarter coin. Insert it into the tread groove with the caribou’s nose pointing down. If you can see the tip of the nose, you’re at or near the legal limit and the tire needs to come off. If the nose disappears into the tread, you have usable rubber left — though a tread-depth gauge from any parts store gives you an actual number for about five dollars.
Check multiple grooves across the width of each tire, not just the centre. Uneven wear — more at the edges than the centre, or more on one side — is a sign of a pressure or alignment problem that should be resolved before a long trip. Our guide to uneven tire wear covers the common causes in detail.
Check 3 — Sidewall and Visual Inspection
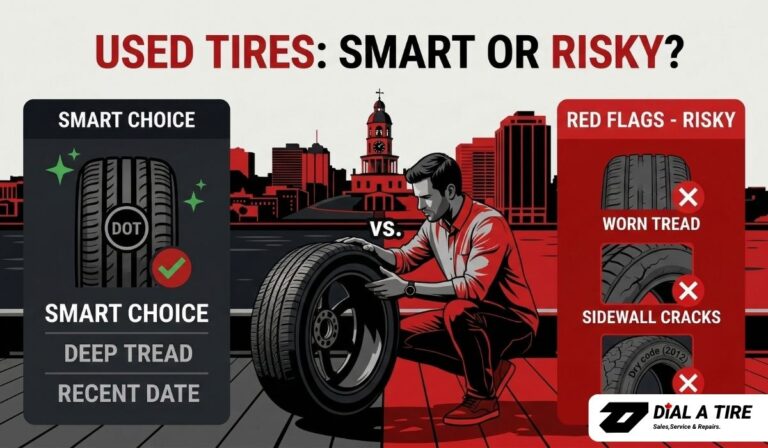
Crouch down beside each tire and look at the sidewall — the curved outer wall between the tread and the wheel. You’re looking for three things: bubbles or bulges, visible cracking, and cuts or gouges.
A bubble in the sidewall means the internal cords that give the tire its structural strength have broken. There is no repair for this. A tire with a sidewall bubble is a tire that can fail without warning, and the Cabot Trail’s steep grades and winding descents are not where you want that to happen. Replace it before you go.
Fine surface cracking (crazing or weather-cracking) in older tires results from rubber degradation over time, accelerated by ultraviolet (UV) light and ozone. Light crazing on an otherwise sound tire isn’t an emergency, but deep or widespread cracking — especially at the base of tread blocks or along the bead (where the tire seats against the wheel rim) — warrants a professional look.
If you find an embedded nail or screw on the tread face, don’t pull it out. A nail in place is often acting as its own plug and the tire may still hold pressure. Drive carefully to a shop rather than yanking the object and arriving on a flat.
Check 4 — Tire Age and Date Code
Rubber degrades with age regardless of how a tire looks or how many kilometres are on it. Most manufacturers and Transport Canada guidance recommend close inspection after five years and replacement by ten years, even if tread is adequate. Atlantic salt air and UV accelerate the process.
The manufacturing date is in the last four digits of the Department of Transportation (DOT) serial on the sidewall. “2319” means the 23rd week of 2019. If any tire — including the spare — was made before 2019, have it looked at before a long trip. Transport Canada’s motor vehicle safety guidance is the authoritative source on tire age thresholds.
Check 5 — Alignment Feel
You don’t need a machine for this. On a straight, flat, quiet road, briefly let go of the steering wheel at low speed. A well-aligned car tracks straight or drifts very slightly (most roads have a slight drainage crown). A car that pulls sharply has an alignment issue — typically from a pothole hit, a curb strike, or worn suspension components.
Significant misalignment accelerates edge wear on your tires. Over a 1,500–2,000 km Atlantic Canada loop, that progression from “marginal” to “dangerous” can happen faster than you’d expect. If your car is pulling, book a wheel alignment in Halifax before you go — it’s a quick job and far cheaper than an early tire replacement, let alone a tire failure on the Cabot Trail’s MacKenzie Mountain descent.
Check 6 — Load Rating and Cargo Adjustment
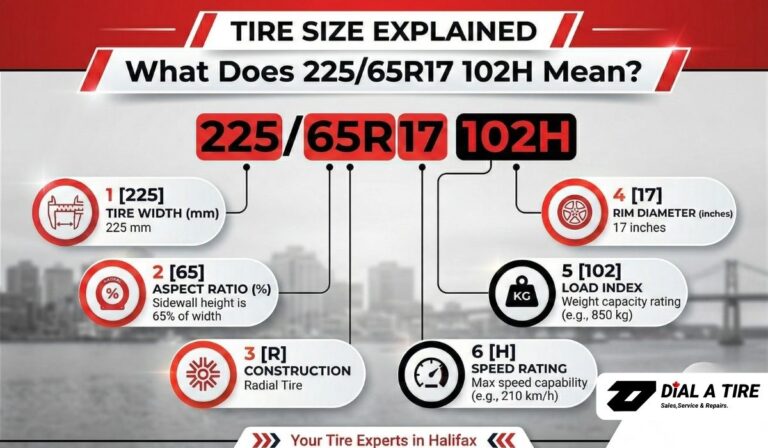
Every tire has a load index — a code number on the sidewall corresponding to its maximum weight capacity. In a marking like “225/65R17 102H,” the 102 is the load index, corresponding to 850 kg per tire. Your vehicle’s Gross Vehicle Weight Rating (GVWR) is on the door jamb sticker alongside the original tire size.
Practically speaking: use the full-load pressure from the door jamb sticker whenever you’re carrying a full passenger load plus luggage. Under-pressuring a heavily loaded tire causes it to flex more than designed, generating excess heat — and the Cabot Trail’s grades approaching Cape Smokey are a genuine workout for loaded tires. Proper pressure is your main protection.
If you’re towing, the trailer’s tires have their own pressure spec — from the trailer manufacturer, not the car’s door jamb. Trailer tires (often marked “ST” for Special Trailer) are not interchangeable with passenger tires in load or inflation specs.
The Cabot Trail Specifically: Why This Drive Is Hard on Tires
The Cabot Trail climbs from sea level to over 400 metres and descends multiple times on the western side of Cape Breton Highlands National Park. Long grades heat tires significantly, especially in a loaded vehicle; descending under braking generates more heat than climbing under load.
Tire pressure rises as rubber heats up — roughly 1 psi per 5–6°C increase. A tire at the correct cold pressure will read several psi higher at the top of a long grade. This is normal; do not bleed pressure from hot tires. Start with the right cold pressure and the hot reading takes care of itself. The switchbacks also add lateral load, which is fine for a tire in good condition — but a borderline tire (low tread, a bubble you’re “monitoring,” a pressure that’s been low for a week) is being pushed harder than it’s designed for. Deal with borderline issues before you leave.
What to Do at the End of the Trip
When you return from a summer road trip, the car has likely covered 1,500–2,500 km in a short period — possibly more kilometres than some months of Halifax city driving. That’s a meaningful chunk of tread life, especially if part of the trip involved gravel roads or construction zones.
After returning, check tread depth again on all four tires. If you started the trip at 4 mm and you’re now at 3 mm on one tire but 4 mm on another, your wear is uneven and a tire rotation is due. If any tire came back with a new screw or nail, get it inspected before it becomes a slow leak in your driveway.
An end-of-summer check is also a good time to think about the upcoming changeover. If your all-season tires are marginal, it’s better to know in August than in October when every Halifax shop is booked solid for seasonal changeovers.
What This Means for Your Car
A 15-minute pre-trip checklist is the difference between a road trip you’ll talk about for years and one you’d rather forget. The six checks — pressure (including the spare), tread depth, sidewall condition, tire age, alignment feel, and load adjustment — are all things you can do yourself in the driveway. None of them require tools beyond a coin and a tire gauge.
If any check raises a concern, call us before you leave. We’re at both Halifax and Bedford, open daily including weekends, and a pre-trip inspection takes far less time than a tow from the Cape Breton highlands.
Ready to head out with confidence? Book a pre-trip tire inspection at Dial A Tire and we’ll run through the full checklist with you, check your alignment, and make sure your spare is actually road-ready. We’d rather see you before the trip than after it.
HALIFAX — Dial A Tire
308 Herring Cove Rd, Halifax, NS
902-475-3358
BEDFORD — Dial A Tire
70 Rosno Lane, Bedford, NS
902-444-3425
Open daily 8 AM–5 PM. Please call before coming.
Locally owned since 1994 · Red Seal technicians · Professional installation & precision balancing